When I wrote these instructions, my initial sourdough starter, Britney, was still alive. I still don’t know quite how she died but it happened after I missed a feed one day, so now I’ve had the fear of god put into me about feeding the starter every day if it’s not in the fridge. I baked with my new starter Ethel for the first time this morning and it went well—the instructions won’t be different from what I’ve written below.
I’ve got help directly and indirectly from a heap of different people, so don’t think any of this is my smarts! It’s been cobbled together from what I’ve learned talking to people and reading around online. In particular, I used Benjamin Law’s initial starter/flour/water ratio (a lot of recipes I found make way too big a loaf), my friend Bec’s “dragging” tip for shaping the dough, and my friend Mike’s baking is what got me keen to try this at all. Hopefully this can serve as a decent foundation for trying your own variations—there is a frightening amount of sourdough info out there.
I also haven’t included instructions for making your own starter, but I’ve used this basic process to make two starters now, and it’s worked well. In my experience it took a few days longer to be ready than the recipe suggests. I was also confused because my starter hadn’t been doubling after 24 hours as it was apparently supposed to—turns out that’s because it was actually doubling in about 4 hours then settling back down by the time it was next ready to feed. For that reason I’d suggest feeding on a morning when you’ll be home all day if you’re not sure whether the starter is ready, so you can keep an eye on it.
Feeding and maintaining the starter
- While you’re trying to build up enough starter to bake with, feed it every day. I keep mine on top of the fridge, but I think it just needs to be somewhere with a consistent temperature that isn’t too hot.
- If you’re not baking for a while you can keep it in the fridge and just take it out the day before you bake and feed it then (leaving it out overnight), but I think it’s better to have it out and feed it more regularly if possible. Even in the fridge though, don’t leave it for more than a week without feeding. If it’s out of the fridge, make sure you’re feeding it daily.
- It doesn’t matter exactly how much you feed it, but it has to be equal weights flour and water, so use scales, not like “cups” or whatever. (I usually feed it 50–75g at a time.) Just tip it in and give it a thorough stir.
- Just use plain flour, not self-raising. I use white, but I’m planning to experiment more with wholemeal. Maybe start with white and see how you go.
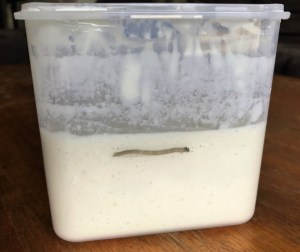
- You know the starter is ready to bake with when it’s roughly doubled, so mark it with a texta when you feed it so you know how much it’s grown.
- Britney is a real grower, so I find she’s ready in about 3–4 hours, but most of what I’ve read says a starter usually takes about 8 hours to double after you feed it! See how long it takes for you, but as long as it’s really bubbly and has grown a fair bit it’ll be fine.

Preparing the dough
- To bake in the morning, I’d probably start this process early evening (so, using a starter that I fed around lunchtime, or even first thing in the morning if you’re out during the day).
- Mix 200g starter with 200g water (use scales)—I use a whisk to make sure it’s thoroughly mixed.
- Add 360g plain flour and give it a good mix. Doesn’t need to be too thorough, just so it’s all together.
- Leave it to sit for 30 minutes to 2 hours, whatever you have time for. This is called the “autolyse”, which is where the flour is absorbing the water and forming gluten. (At each step in the process where you leave the dough to sit, cover it with a tea towel to help stop it drying out.)
- While it’s sitting, dissolve 10g salt in 50g boiling water. I leave it to dissolve while the autolyse is happening.
- At the end of the autolyse, add the salty water and smoosh it into the dough with your fingers. Keep working it in until the mixture is consistent. It’ll be super wet at this point, but don’t stress.
- Leave it for 10–15 minutes.
- Now it’s time for the “stretch and fold”, which you’ll be doing 4–6 times over the next 2–3 hours, at 20–30-minute intervals. In general, for a good crumb in the bread more times is better (up to about 6) and with bigger gaps (up to 30 minutes) but it depends what you have time for. There’s a bit of room to move. This can all happen in the mixing bowl, too—I only take it out at the last step (the “shaping”).
- So, to stretch and fold: sprinkle flour over the top of the dough, particularly around the sides, then flip the dough over so the floured side is on the bottom. Grab the dough at one edge, stretching it up and folding it over onto itself. Repeat on each side (so, four times total).
- After your last stretch and fold, leave it to sit for 10–15 minutes.
- While it’s sitting you can prepare your “banneton”. You can buy them online, but I just use a colander with a tea-towel in it (I think it needs to be something with holes, which is why you can’t just use a bowl). I put the tea-towel in and rub flour all around the inside. The shape of the banneton is the key here—it has to be something that isn’t too broad at the base, or when the dough rises it will spread out too much, rather than up.
- Dust a flat surface (like a bench or a large chopping board) lightly with flour. Take the dough out of the bowl and shape it lightly into a ball with your hands. Place the dough on the floured surface with the “seam” side down (where the folds from the stretch and fold are).
- Make sure your hands are well floured, then grab the dough and drag it towards yourself across the surface, so the friction pulls the front of the ball of dough down underneath itself, building surface tension. Repeat this on different sides of the ball until it is keeping its shape fairly well.
- Again making sure your hands are well floured, carefully lift the dough off the work surface and into the banneton, making sure it keeps its shape.
- Cover with a tea towel and pop it in the fridge.
Baking your loaf
- So, and I probably should have mentioned this earlier, to make this work you’ll need a dutch oven, or something like it. I don’t actually have one, so I just use a big, stainless-steel soup pot with a thick base and it seems to work fine. The main things are size, thickness (insert dick joke) and a well-fitting lid.
- First thing in the morning, turn the oven on to 250°C. Put the dutch oven (or equivalent) inside your oven, with the lid on, while it’s heating up—the dutch oven also needs to be super hot when the bread goes in.
- After about 30 minutes (you need to be really sure it’s hot enough) take out the dutch oven and get your dough out of fridge—it should have grown over night, and the dough should have a nice “spring” to it, as in, it should slowly bounce back if you poke it with a finger.
- Sprinkle some flour onto the inside of the dutch oven to stop the bread from sticking.
- Take the dough carefully out of the banneton, maintaining its shape, and lower it even more carefully into the very hot dutch oven. This can be tricky to do without burning yourself!
- With a sharp knife, score the dough a few times, going a couple of centimetres deep. I do a couple of long scores across the length of the dough but I don’t think it matters exactly how you do it.
- Put the lid back on the dutch oven and put it in the oven.
- 25 minutes later, take out the dutch oven and remove the lid. The bread should have risen as much as it’s going to rise—the loaf will still be pale but should have burst open a bit along the scores as it rose. Aside from the colour, it should look pretty much like bread.
- Turn the oven down to 220°C and put the dutch oven back inside with the lid off.
- Keep an eye on the colour of the loaf as you continue baking, and after about 15 minutes, take the dutch oven out again.
- This next step is optional—if you don’t care about browning the base of the loaf as well you can just leave it in longer at the step above, until the loaf is a dark brown (should take about 30 minutes). You want to push the colour to the point where it almost looks burnt. Apparently this is good for flavour and for a good crust.
- If you do want to brown the base, take it out after 15 minutes in with the lid off and tip the loaf out onto the bench. Put the loaf back into the oven without the dutch oven, baking it just on an oven rack. Keep baking it for another 15 minutes or so, until you get it to the colour described above (or whatever colour you want).
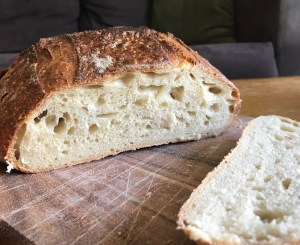
- Now you have bread! As tempting as it is to want to eat it hot, the taste and texture of the bread will be better if you leave it at least a few hours to cool down. Some people even say to leave it 24 hours before slicing, but that seems excessive to me. I think 3 or 4 hours is fine.